Tag Archives: salt-dough

a Lord of Plenty sculpture

Standard

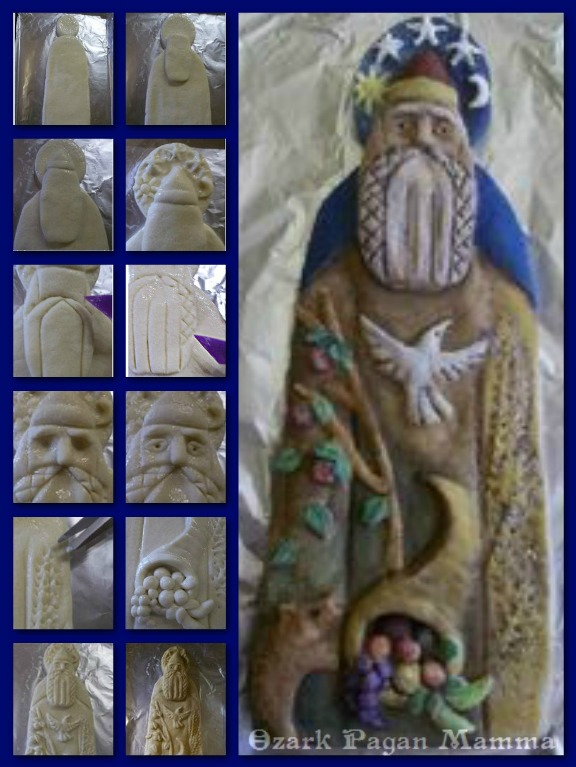
Abundance, or the Lord of Plenty- as I like to call him, is the third primal Power in Waincraft, the second born of Mother Night, and bright twin of the Wild Father. In creating a sculpture to represent him for my altar, I drew on imagery of what this Power represents for me from Germanic and Celtic sources, but also a lot from intuition.

As for how I made the sculpture, just as I did with my Wild Father sculpture, I started with a regular batch of salt dough (2 cups flour, 1 cup salt, and about a cup of water). After kneading, I broke off a big chunk of the dough and formed a rectangle and rounded off the top edges for shoulders. I rolled out some more dough and cut a circle shape with a drinking glass. This I placed above the shoulders as a backdrop to the head and celestial objects around the figure, making the basic size and outline match its twin sculpture.

Lord of Plenty construction
The beard and face were all one rounded rectangular piece. (When attaching a new piece, always dampen the base surface.) I used a cutting tool to add details to the beard. A tiny rope of dough was used for the nose/eyebrows. After making soft indentations for the eye-sockets, I attached tiny balls of dough for the eyes, poked holes for the pupils, and cut horizontal slits to suggest eyelids.

I cut grooves into the sides of the figure to suggest arms of a robe. The wheat-like texture on the right of the figure was made with little scissor snippets.

The cornucopia, pig, and bird shapes I added to the base were cut out of dough flattened with a rolling pin. Ropes of dough were used to make the tree branches and the sun rays. The apples and leaves on the tree, and fruit in the cornucopia were all made from small balls of dough. For the leaves, I flattened small balls of dough and pinched each end. The stars around the head started out as tiny balls of dough also. I cut and carved their shapes after attaching, pressing down with a small tool, the areas I wanted to recede into the background.

For the opening to the cornucopia, I pressed into the base a little with my thumb, then attached a rope of dough around it, smoothing with dampened fingers where the rope joined to form a circle. I then pressed ridges into the cornucopia basket.

When completely done shaping and blending, I baked it at 250°F for several hours.

After cooling, I painted all the grooves and crevices with an acrylic craft paint in the shade of burnt umber to get a good contrast. I used a paintbrush dipped in water to blend a little bit of the color to other areas for lighter contouring. When this was dry, painted the rest of the piece. When all of this was dry, I sprayed the entire piece with a coating of clear acrylic.

My new altarpiece now sits upon the fireplace mantle next to a small cauldron. I hope this description of how I made it was useful to anyone wishing to make something similar.

Lord of Plenty

a Wild Father sculpture

Standard

Wildness, or as I prefer to call him- the Wild Father, is the second primal Power in Waincraft, the first born of Mother Night, and dark twin to the Lord of Plenty. In creating a sculpture to represent him for my altar, I drew on imagery of what this Power represents for me from both Celtic and Norse lore.

Instead of telling you which deities I drew on for this, I will just say that one was a deity I followed in my early days as a Pagan, and one is a later patron. The idea that both deities draw from (or are aspects of) the same Power, holds deep spiritual meaning for me. Many other deities come to mind as well when I gaze upon this altar piece. I don’t want to name specific names here because I want others to see what is most meaningful to them.

As for how I made the sculpture, I started with a regular batch of salt dough (2 cups flour, 1 cup salt, and about a cup of water). After kneading, I broke off a big chunk of the dough and formed a rectangle and rounded off the top edges for shoulders. I rolled out some more dough and cut a circle shape with a drinking glass. This I placed above the shoulders and a backdrop to the head and antlers of the figure.

crafting the wild god

Working with salt dough is pretty simple. The shapes I add are usually rolls (for hair, beard, antlers, snake…) or balls of dough (like for the head). When attaching a new piece, always dampen the base surface. With dampened fingers, I continue to shape and blend pieces after attaching to the base.

Small flattened balls of dough are blended on the face for cheekbones and a tiny roll of dough for the nose/eyebrows. For simple deep-set eyes, I poked holes with a toothpick. You may not be able to tell from this photograph, but one eye is closed.

I cut grooves into the sides of the figure to suggest arms of a robe, and I dug deep grooves into the center to form a tree. I scratched texture into the sides to represent vining spiraling wild growth. When completely done shaping and blending, I baked it at 250°F for several hours.

After cooling, I painted all the grooves, crevices, and backdrop of the antlers with an acrylic craft paint in the shade of burnt umber to get a good contrast. I used a paintbrush dipped in water to blend a little bit of the color to other areas and for lighter contouring of the hair and face. When this was dry, I sponged on brighter colors on many of the raised areas and painted the snake a sage green. When all of this was dry, I sprayed the entire piece with a coating of clear acrylic.

My new altarpiece now sits upon the fireplace mantle. I hope this description of how I made it was useful to anyone wishing to make something similar. Check in next week and I’ll tell you how I made my sculpture of the Wild Father’s twin- the Lord of Plenty.

Wildfather

shifting paradigms and the star goddess

Standard

Over the past few months I’ve been contemplating a new paradigm for my personal spirituality, not so much a “changing of the gods” as when I went from Celtic Recon to predominantly Heathen, but rather, something that could combine the two or even take the focus a little bit away from culture-based spirituality. Also, something that acknowledges squishy polytheism.

At first I looked into Proto Indo European religion and liked a lot of what I read. However, the harshly patriarchal mythology left much to be desired. Waincraft kept popping up as a possibility. I really liked a lot of the ideas, but coming from scholarly traditions like ADF and CR, I was a little put off at first by the amount of UPG or SPG. However, the more I started looking into it, the more it resonated. It is really well thought out. I’m actually gaining a deeper understanding of Northern European Paganism through this system.

So I began to really contemplate the world view, Powers and new mythology of Waincraft. After a while I began to think about how I might rearrange my altar space to reflect my new framework and incorporate some new deities and combine Waincraft and ADF symbolism. So one day I was doing my daily (or semi-daily) devotionals, asking the Kindreds for guidance as I shuffled my tarot cards. One literally jumped out and landed in front of me face-up and upright. I took it as a sign that this card was my omen. A chill ran through me. The visual of Queen of Pentacles made me immediately think of the Star Goddess (Night)–the first deity of Waincraft.

queen of pentaclesI took this to mean that the Spirits wanted me to go forward on this new path. I decided I would rearrange my altar tiles and buy, make, or re-purpose an image to represent the star/night goddess on my altar. As I picked up one of the tiles to rearrange (the Heimdall tile I made three years ago), it crumbled in my hands. The tile had broken into several pieces the year before, as did most of the others I had at the time, and I had glued them back, but I guess the damp spring we had this year was just too much humidity for them. Upon examining the other altar tiles, I discovered they were in the same ready-to-crumble shape. I hadn’t planned on such a big change in altar layout, but it seems this was meant to be. I will still be honoring my same gods, but their representations are going to be different, as are the way I think of them in relation to each other and the world.

So starting at the beginning, I made a representation of Mother Night. I wanted to re-purpose an already made statue for this, for the sake of sturdiness and longevity, but unable to find the right one, I decided to go with making one of salt dough to serve for now. Instead of using “strong salt dough” like I’ve done in the past, I just used the regular formula: 2 cups flour, 1 cup salt, and about a cup of water. And instead of air drying it, I decided to bake it at 250°F for several hours.

I went with a flat back like for the tiles I made, and flattened the bottom end so that it could be stood up when finished. I wanted her to have long flowing robes and outstretched arms. Since the robes drape down from her arms and flow into her diaphanous dress, it forms a good solid shape with no small parts to break off. The resulting piece was thick, solid, and sturdy after oven drying. Oven dried salt dough seems more bread-like than air dried, and less grainy. It may still break eventually, but maybe not crumble apart like the other ones did.

crafting a star goddessThe first coat of paint was glossy black. I then sprayed on small spurts of various shades of purple, some blue, and a little bit of silver. Later I sponged on some lavender to highlight some places that needed it. Finally, I splattered on white paint with a toothbrush to make stars.

I’m still working out how to combine ADF with Waincraft for my personal spirituality. But this beginning feels right. I feel like I’m being true to myself and reconnecting with some powers and energies that I had long forgotten about.

“We are stardust
We are golden
And we’ve got to get ourselves
Back to the garden.”
-Joni Mitchell

salt dough star goddess

memory triggers for learning the runes

Standard

Learning the names, meanings, and other association of the elder futhark runes can be a very daunting task. The ability to memorize things is definitely not one of my strong points. That’s probably why I procrastinated so long on learning the runes. And actually main motivator in doing so was to be able to give the omen at rituals without having to fumble with a “cheat sheet” of rune meanings. Casting the omen at ritual was one of those things I couldn’t really get out of; I’m the organizer of our small ADF Protogrove, and any ritual parts that no one wanted to take, I ended up doing. I didn’t have much faith that I would be able to memorize all the symbols, names and basic meanings, but I figured I’d better try. Turns out, I was much more successful than I thought I would be.

I started by associating the shape of each rune with it’s meaning. Here are some associations I used for initial memorization of a very basic meaning and other information for each rune:

fehu – means cattle and cattle equates to moveable wealth. Two lines jutting out from the vertical line remind me of cow horns. This rune looks like an F, and represents the letter F.

uruz – means auroch, a wild European ox that is now extinct. It represents primal power. I thought that the shape of this rune looked like what I imagined the profile of a ox’s body would look like; broad in the shoulders but tapering down at the hind quarters. It’s also an upside down U, and this rune represents the letter U.

thurisaz – means thorn or thurs (giant). It represents danger or a warning. It looks like a thorn and represents the sound “th”.

ansuz – means ás (a god), in particular; Odin. It represents communication, which is Odin’s domain. This rune almost looks like the letter A (if you were to extend some of the lines), and it represents the letter A. I think “A for answers”, to remember its meaning.

raido – means riding and this rune has to do with travel. It looks like an R, and represents the letter R. R for riding.

kenaz – means torch. It represents illumination and knowledge. Imagine a flashlight on the left of it, and it looks like a drawn image of light shining forth. It looks like the letter C, and represents C or K.

gebo – means gift. This rune has connotations of hospitality and relationship. The X reminds me of the criss-cross over the top of a round loaf of bread, or ribbons on a present. Gebo and gift both start with G, the letter this rune represents.

wunjo – means joy. It looks like a banner on a stick, something someone might wave in a joyous parade, or a balloon on the end of a string. The first part of it’s name reminds me of the word “win” (though it’s not pronounced like it). Both words start with W, and this rune represents that letter.

Thus ends the first aett (eight). I wanted to remember the sequence of the runes, so that I could recite them to myself as a memorization practice. So to remember this first aett, I thought;

“The futhark is a gift of joy.”

The first seven runes spell out the name given to the runes, “futhark”. Gift and joy are the meanings of the last two runes in the sequence.

hagalaz – means hail or hailstone. It is taken to mean a big change or crisis, much like the destruction of a hailstorm. It could be thought to resemble hail ricocheting between two walls. It’s often regarded as Hella’s rune. It looks like an H and represents the letter H.

nauthiz – means need. It looks like the way someone would rub two sticks together to make a need-fire, or the whittling sign an old granny would make with her fingers as she says “tsk tsk, naughty naughty”. This rune represents the letter N and has needful or negative connotations.

isa – means ice. It represents stasis, the way everything is still and immobilized in the winter when all is frozen. It looks like an icicle. It looks like the letter I and represents the letter I.

jera – means year (the J is pronounced like Y) and may represent a year’s work or harvest; an earned reward. It looks like two cupped hands coming together to do work. This rune represents the letters J and Y.

eihwaz – means yew, the world tree. It represents initiation and mysteries of life and death. It could be seen as a sparse tree, with one branch at the top, and one root at the bottom. This rune represents the sound “ei”, pronounced “eye”, so I think of Odin the one-eyed and his sacrifice on the world tree.

perthro – means dice cup. This has been interpreted to mean gambling or divination, which are things you might do with a dice cup. Casting lots have to do with fate (destiny) and mystery. The shape of this rune is like an overturned cup or pouch. The name has the sound “throw” in it, and you throw dice.

algiz – means elk sedge. It is a protective rune, shaped like the plant it’s named for. It’s shape also reminds me of a pitchfork or trident, which are protective implements. It represents the letter Z.

sowilo –  means sun. It represents energy and success. It looks like a sunray or the letter S.

So now we’ve come to the end of the second aett. The phrase I used to remember this rune sequence was:

“Hella needs an ice harvest. I was destined to protect the sun.”

The first sentence is made up of meanings and associations of the first four runes of this aett. In the second sentence, “I was” is one possible pronunciation of eihwaz. The rest of the sentence goes along with associations of the last three runes in the aett.

tiwaz – is named for the god Tyr, god of justice. It represents honor and fairness. This symbol points up toward the sky, and Tyr was a sky god. I also think of it as a ‘spear of justice’.

berkano – means birch goddess. It is a rune of blessing and fertility. It looks like a B, and represents the letter B. B for blessing. It also looks like a pregnant woman in profile.

ehwaz – means horse. It represents transportation, teamwork, trust and harmony. To remember the meaning of this one, I considered that it looks a bit like a horse, and the part that dips down in the middle could be a saddle. If this rune is turned on its side, it resembles an E, which is the letter it represents.

mannaz – means mankind. It is a rune of awareness and social order. This one looks like two stick figures embracing in a side hug. The letter is represents is M.

laguz – means water. People have associated this one with things already having to do with water in esoterica; emotions, dreams, mystery, the subconscious. The rune looks like an ocean wave or a ship’s sail. The name of the rune makes me think of the word lagoon. It kind of looks like an upside down L, and represents that letter.

ingwaz – means the god Ing (Frey), or seed. This rune contains the meanings and attributes of Lord Ing; fertility, agriculture, growth. There are two ways this rune is represented. One is an X stacked on another X, which looks like a plant springing up. The other is the shape the two Xs make in the middle- a diamond shape which could represent a seed. The sound this rune represents is “ng” as in Spring.

dagaz – means day. It is generally interpreted as awareness or awakening. It kind of looks like daybreak through a window or between two walls. The letter it represents is D.

othala – means home. It generally means an inheritance or belonging. Looking at the rune, you’ll notice two other runes in it: gebo (gift), and Ingwaz (Frey). So othala is a gift of Frey. The rune itself looks a bit like a house. The letter it represents is O.

So now we’ve come to the end of the last aett. This is what I used to remember the sequence:

“Tyr blesses horses and men, sail-ing all day to home.”

So those are the memory tricks I used to get started. Once I got those basic connections, I knew I would be able learn more and retain it. Soon I was able to practice retaining this knowledge by writing down the runes on a scrap of paper, in the right order, reciting their names and recalling their bare-bones meanings as I went along. Knowing this much encouraged me to continue studying the runes in depth. I hope some of these memory triggers help others get started as well.

memory triggers for learning the runes


Frigga Tile

Standard

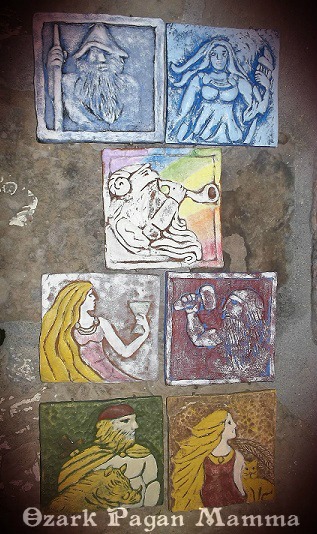
Recently, I finished a series of seven Norse deity tiles for my altar. There were some long gaps in time between making each one, and originally I aimed only to make tiles of the gods, and as for the goddesses, I made flat-backed figurines to hang on the wall in between the god tiles. However, at some point I thought it would look nicer to have them all be tiles.

My seventh tile was also my first craft project done in the new place. The inspiration for my Frigga tile was an illustration of Frigga from “Myths of Northern Lands” by Hélène Adeline Guerber.

In all my tiles, I’ve tried to include a specific feature so that each may be easily recognized as the deity they represent. So for Frigga, it was her distaff. It was actually harder to get the arm and hand shaped the way I wanted it than it was to form the distaff.

But the hardest part of the entire project for me was the face. Overall, I’d say my style of sculpting is “primitive”, though I have achieved much more detail than I ever thought I could with salt dough.

Frigga Tile

After the dough was completely air dried, I gave the tile a good coat of blue acrylic paint, them after that was dry, I sponged on light blue, mainly just getting the color onto the raised parts of the tile, letting the deeper lines and indentions remain the darker color. I let it dry for several days before I sprayed on a protective acrylic clear coat.

The tiles are roughly five and a half inches square. This one was made with regular salt dough, though most of the other ones were made with a stronger formula. All of them have a tack hole pressed into the back for hanging, although now I use plate hangers instead of hanging them from a tack since late last summer the humidity caused most of the ones I had made at that time to fall and break. (Don’t worry, I glued them all back- good as new, and gave them a clear coat.)

salt-dough altar tiles

12 Nights of Yule — Dough Ornaments

Standard

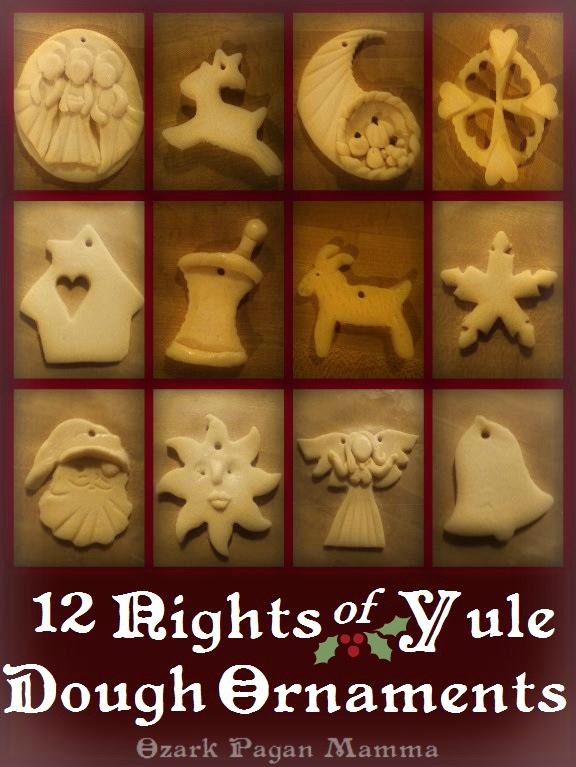
Simple symbols crafted in dough is a classic craft to help kids celebrate the 12 Nights.

Salt dough can last a long time if stored well. You can add cinnamon for color and scent. Apple cinnamon dough is another alternative with a darker color and stronger scent. Besides the dough ingredients, you’ll need a flat working surface, rolling pin, cookie and biscuit cutters, a butter knife, toothpick (and/or any clay tools you might like to use), a straw (for making a hole for hanging), and wax paper on a tray or piece of cardboard (for drying). After the ornaments dry, you’ll need string or ribbon for hanging.

Some of the symbols are pretty straight-forward cookie cut-outs, for others, there’s a little bit of method involved. Evenly roll out your dough to a medium thickness; too thin and it will break easily, too thick and it will weigh too much to hang on your Yule tree. Remember to lightly dampen dough with water when joining pieces or adhering to a base layer.

For the 1st Night of Yule, sacred to Frigga and the Dísir (ancestral guardian mothers), make a Three Matronae ornament. Roll out your dough and cut out a circle using a medium lid as a template. Cut out three triangles and attach to the circle side by side. Cut out three circles with a small circle cutter or bottle cap, and attach to base above triangles to represent hair or halos. Roll out smaller circles for their heads and flatten just above triangles. Roll out little coils of dough for their arms. Make little half circle bowls for one or more of them to hold. Poke a hole in the top for hanging and set aside to dry.

three mothers ornament

For the 2nd Night of Yule, the night of the Wild Hunt, simply roll out the dough and use a cookie cutter to cut out an animal shape that represents the Hunt. A horse is a good one, and so is a hound. It is easy to find deer cookie cutters and this would work nicely as well. Use tools to etch in details and texture, if you like. Poke a hole in the top for hanging and set aside to dry.

For the 3rd Night, the High Feast of Yule, make a cornucopia. Roll out your dough and cut out a large circle shape, using a biscuit cutter or lid. Use a small biscuit cutter (about 1/2 the size of the big one) to cut away a piece from the edge of your dough circle to where you have a fat crescent. Place a biscuit cutter over one of the crescent ends. Press down on one side only to round out and trim away the end. Roll out a dough coil and form into a circle to place on the rounded end of the dough circle. Use your thumb to indent dough inside coiled ring. Add little dough balls to represent fruit. (You can press in whole cloves for fruit stems.) Use the handle of a butter knife to press ridges into the cornucopia. Poke a hole in the top for hanging and set aside to dry.

cornucopia ornament

The 4th Night of Yule is sacred to Freya, Njörd, and Ægir, but we like to honor the whole of the Vanir gods as well. The wagon wheel is a symbol of the Vanir, and the heart is a symbol for Freya. To make this wagon wheel ornament, roll out your dough and use a lid or biscuit cutter to cut out a circle. Using a small heart cutter, cut our four hearts around the center, with points toward the center. This establishes a four spoke wheel. Take the hearts that were cut out and attach around the edges between the cut out hearts.

vanir wheel

For the 5th Night of Yule, the night of community, use a cookie cutter to cut out a house shape, and a small cutter to cut out a window. Alternatively, you could cut out out several people with cookie cutters and join their hands together. Poke a hole in the top for hanging and set aside to dry.

For the 6th Night of Yule, sacred to Eir, goddess of healing, make a mortar and pestle. Roll out dough and use a large biscuit cutter to cut out a circle. Use the same biscuit cutter to trim pieces out of both sides to resemble a mortar. Use a butter knife to cut a straight bottom. Attach a coil shape to the top (at a sideways slant) and a flatten a ball shape to the top of the coil. Make dough coils for the top and bottom rims of the mortar and attach. Poke a hole in the top for hanging and set aside to dry.

mortar and pestle

For the 7th Night of Yule, sacred to Thor, make Thor’s goat. Roll out you dough and use a goat cookie cutter to cut out the shape. If you don’t have a goat cookie cutter, use a deer cookie cutter instead; after you have cut out the shape, trim away the antlers and replace with little coils of dough to resemble goat horns. Use a fork to scrape in fur texture, or press some dough through a garlic press and attach to goat. Poke a hole in the top for hanging and set aside to dry.

For the 8th Night of Yule, sacred to Skaði and Ullr, make a snowflake. If you don’t have a snowflake cookie cutter, you can use a star cookie cutter. Roll out your dough and use the pointy end of a small heart cookie cutter to cut two notches out of the sides of each star point. Poke a hole in the top for hanging and set aside to dry.

snowflake ornament

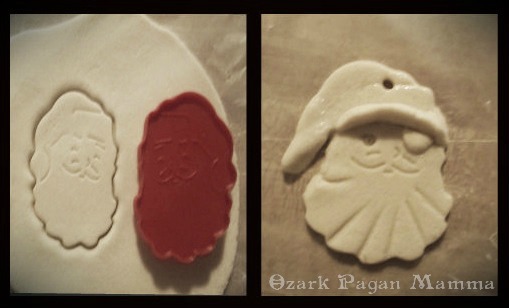
For the 9th Night of Yule, sacred to Odin, make a Yule Father ornament. Roll our your dough and use a Santa cookie cutter to press out your shape. You can make the ornament look more like Odin by pinching the top of the hat to make it pointy (instead of pom-pom topped), and pinching up a hat brim. You can also make him an eye patch. Press in face details with a toothpick or other tool. Poke a hole in the top for hanging and set aside to dry.

Odin ornament

For the 10th Night of Yule, sacred to Sunna and the Ancestors, make a sun ornament. If you don’t have a sun cookie cutter, use a flower cookie cutter instead. See my sun plaque article for tips on making a sun face. Poke a hole in the top for hanging and set aside to dry.

For the 11th Night of Yule, sacred to all of the goddesses and the Valkyrie, make a goddess/Valkyrie ornament. Roll out your dough and cut out a triangle shape. Cut out and attach two teardrop shapes to the triangle sides. Attach a cut out of an upside down heart over the top of the triangle, and a flattened dough ball above this. Use the handle of a butter knife to press in skirt folds. Use coiled dough to make the arms and hair. (Alternatively, you could use an angel cookie cutter to make this ornament.) Use toothpick or other tools to add details, if you like. Poke holes in the top of each wing for hanging and set aside to dry.

goddess ornament

For the 12th Night of Yule, Oath Night, sacred to all the gods, make either an Oath Night pig, or a bell to ring in the New Year. Roll out your dough and use your choice of cookie cutter to cut out your shape. Use tools to add details, if you like. Poke a hole in the top for hanging and set aside to dry.

When your ornaments are dry, you can paint them. If you added cinnamon to your dough (or used apple cinnamon dough), you will want to let the dough show instead of painting over it. But you may want to use a little bit of white puff paint on dark dough for accents and contrast. When paint is dry, lace a string or ribbon through the hole for hanging.

Parents, you can use the ornaments to help your child commemorate each Night of Yule… have each of them put away in their own individual drawstring bags (or drawers in a box), and have your child take out each ornament on it’s specified day and hang on your Yule tree.

12 Nights of Yule Dough Ornaments

salt-dough hog’s head

Standard

Long ago, people made their First Night oaths while placing a hand over a hog’s head at the last of the Yule feasts of the year. Modern Asatrúar usually use a ceremonial ring or hammer these days. However, I thought it would be fun to sculpt a hog’s head from salt dough to use in such a way, or at least use as an altar piece or table setting to remind us of our ancestors. Here is how I made it:

salt dough hog's head

1. First, I mixed up a batch of salt dough. To make the dough go further, and dry faster, I wadded up a piece of aluminum foil to go in the middle and wrapped the dough around it.

2. To the ball shape, I added a snout.

3. I used my thumb to indent eyes on either side of the head, and inserted blue marbles for eyes.

4. The end of a fork made a nice tool for creating a bit of fur texture.

5. I used a butter knife to create ridges on top of the snout.

6. The butter knife was just the right size for making the nostrils as well.

7. For the tusks, I made little indentions in the sides with the end of a wooden spoon and attached little tapered coils of dough. (Remember to lightly wet dough when joining pieces.) I used the same method to make the ears.

8. To add more dimension to the fur texture, I snipped lightly into the dough all over, from front to back, with scissors.

Later, I cut a slit in the mouth and inserted a ball of dough to resemble an apple. When the project was completely dry, I painted it with water-based antiquing medium, and painted the apple barn red.

Hog's Head

salt dough wheat plaque

Standard

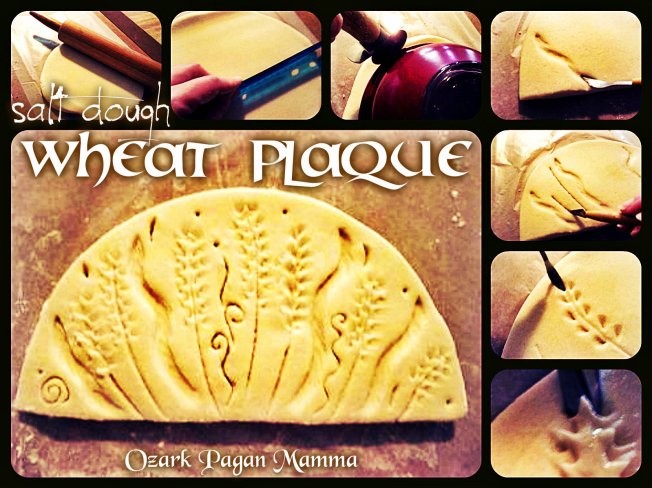
With Lughnasadh/Lammas coming up in a couple of weeks, a fun project to work on is a wheat plaque to decorate the family altar, hearth, or nature table. I used ordinary salt dough for this project (1 cup salt, 2 cups flour, and around 1 cup water). You can add paint or food coloring to the dough if you like, or paint after the project is completely dry.

First, I rolled out my well-kneaded dough, thickly and evenly. I used a mixing bowl and pizza cutter to get a clean even arch at the top. Then I used a ruler to cut a straight bottom edge. I used a teardrop shaped clay tool to press in tall grasses, and a knife tool for the wheat stalks. I used a couple of methods for the wheat grains; one is to press in each grain with the teardrop shaped clay tool, and the other is to make little snippets up and down the stalk with the end of a pair of small scissors. The latter method is my favorite, because it adds interesting dimensions to the plaque. I added swirls and small holes for a finishing touch. The plaque can be hung on the wall when dry (don’t forget to poke a hole in the back with the blunt end of a tack when turning over to dry the back), or propped up on a shelf.

If you’re feeling adventurous, try curving the plaque around a foil-covered vase to dry, then attach salt dough rings to the back to hold candles. If you poke holes all the way through the plaque with a straw, you can add amber colored beads that would shine in the light of the candle.

wheat plaque

salt dough sun plaque

Standard

With the Summer Solstice coming up this month, I thought I’d share this fun little sun plaque craft.

I used strong salt dough, because I had a batch on hand, but you can use regular salt dough as well. After mixing and kneading the dough, I rolled it out thick and cut it into a five inch circle using a lid for a template and cutting around it with a pizza cutter. I made a circle indention in the middle with a small jelly jar, for the face. The nose is just a small coil shape placed in the middle of the circle face and smoothed down with dampened fingers at the top. (Remember to dampen the surface of the salt dough before adding pieces.) I used my fingertip to make indentions for the eye areas. The lips are made from three tiny balls of dough pinched up on the ends. I attached two flattened dough balls for cheeks. I found two little amber-colored beads to press in for eyes. Then when it came time for the sun rays, I looked around my kitchen for something triangular or sun-ray shaped and spotted the ends of my fine mesh metal sifter- perfect! If you decide to make a sun plaque with your little ones, remember to press a hole in the back for hanging when you flip it over to air dry the back. If you have leftover salt dough, make some little sun medallions!

salt dough sun plaqueFor more Summer Solstice fun, see Kids’ Activities for Midsummer / Summer Solstice.

Simple Salt-Dough Goddess Plaque

Standard

If you’ve never really worked with salt dough before, or are looking for a Pagan craft project for your children, this is a fun, easy, and meaningful project to start with. The plaque pictured is a depiction of the Celtic Goddess Brigid, but this method can be easily adapted for making other goddesses as well by changing the details; put flowers or a rabbit in the hands for Ostara, fruits for a harvest goddess, etc. I used a strong salt dough formula for this project so that the finished project will be strong enough to hang on a wall.

supplies:
1 batch of mixed & kneaded strong salt dough
tools: clay cutting tool or butter knife, pencil, wooden spoon, raised thumbtack
wax paper
cookie tray
paint (optional)

Step 1: Break off a handful of the salt dough and roll out a cylinder shape, narrower at the top, and flatten. This is the base of your plaque. When attaching additional dough pieces, remember to lightly dampen areas of the base with fingers dipped in water.

Step 2: Use the handle of a wooden spoon to press in ridges to resemble a flowing skirt.

Step 3: Roll out an oval-shaped ball of dough. Press onto top of base.

Step 4: Roll out a snake shape for the arms. Drape over the top and curl to meet slightly below the breasts or at the stomach.

Step 5: With dampened fingers, smooth top crease and shape shoulders and neck.

Step 6: Roll out a ball for the head and attach to the top.

Step 7: Roll out a thickish snake shape for the hair. Flatten and drape over top of head.

Step 8: Use a clay tool or butter knife to make a part in the hair, lines in the hair, and the neckline of a dress.

Step 9: Use a pencil to make eye holes, slanting the pencil to the side to shape. Roll out a small ball for a nose and blend into face with dampened fingers. (Paint on a mouth after drying, if desired.)

Step 10: Add something for her to hold. This one is holding a flame. To make a flame, shape a little lump of dough into a teardrop shape, cut wavy lines in it, and place it atop her hands. Roll out a narrow coil for a snake and place at the end of her skirt. Lay completed project flat to dry on wax paper-lined cookie sheet. After the top is dry, turn over and press a hole in the top center with the blunt end of a raised tack, for hanging. Let dry completely and paint, if desired.

goddess plaque how-to