Tag Archives: Arts & Crafts

a Lord of Plenty sculpture

Standard

Abundance, or the Lord of Plenty- as I like to call him, is the third primal Power in Waincraft, the second born of Mother Night, and bright twin of the Wild Father. In creating a sculpture to represent him for my altar, I drew on imagery of what this Power represents for me from Germanic and Celtic sources, but also a lot from intuition.

As for how I made the sculpture, just as I did with my Wild Father sculpture, I started with a regular batch of salt dough (2 cups flour, 1 cup salt, and about a cup of water). After kneading, I broke off a big chunk of the dough and formed a rectangle and rounded off the top edges for shoulders. I rolled out some more dough and cut a circle shape with a drinking glass. This I placed above the shoulders as a backdrop to the head and celestial objects around the figure, making the basic size and outline match its twin sculpture.

Lord of Plenty construction
The beard and face were all one rounded rectangular piece. (When attaching a new piece, always dampen the base surface.) I used a cutting tool to add details to the beard. A tiny rope of dough was used for the nose/eyebrows. After making soft indentations for the eye-sockets, I attached tiny balls of dough for the eyes, poked holes for the pupils, and cut horizontal slits to suggest eyelids.

I cut grooves into the sides of the figure to suggest arms of a robe. The wheat-like texture on the right of the figure was made with little scissor snippets.

The cornucopia, pig, and bird shapes I added to the base were cut out of dough flattened with a rolling pin. Ropes of dough were used to make the tree branches and the sun rays. The apples and leaves on the tree, and fruit in the cornucopia were all made from small balls of dough. For the leaves, I flattened small balls of dough and pinched each end. The stars around the head started out as tiny balls of dough also. I cut and carved their shapes after attaching, pressing down with a small tool, the areas I wanted to recede into the background.

For the opening to the cornucopia, I pressed into the base a little with my thumb, then attached a rope of dough around it, smoothing with dampened fingers where the rope joined to form a circle. I then pressed ridges into the cornucopia basket.

When completely done shaping and blending, I baked it at 250°F for several hours.

After cooling, I painted all the grooves and crevices with an acrylic craft paint in the shade of burnt umber to get a good contrast. I used a paintbrush dipped in water to blend a little bit of the color to other areas for lighter contouring. When this was dry, painted the rest of the piece. When all of this was dry, I sprayed the entire piece with a coating of clear acrylic.

My new altarpiece now sits upon the fireplace mantle next to a small cauldron. I hope this description of how I made it was useful to anyone wishing to make something similar.

Lord of Plenty

Harvest Dollies for Modern Pagans

Standard

Historically, grain dollies were made from the last sheaf harvested, and either left in the field or placed wherever grains were stored. It was often tied or plaited to be roughly human shaped, but in some places shaped like an animal. It was representative of the Spirit of the Harvest, or the Corn Mother. In Ireland, the grain harvest is associated with Lúnasa. But the god Lúgh is not a grain god or earth god. He’s not John Barleycorn (who is English, and more about the production of beer). Lúgh isn’t a sun god either, but I’ll get to that later.

The grain dolly from the previous harvest would be ploughed into the first furrow of the new season in the spring, or else otherwise destroyed in some way to release the spirit of the previous year’s grain. Another tradition, the one that most Pagans follow (and I don’t know the origin), states that it is to be kept to insure a bountiful crop through the next harvest season and burned around the time that a new one is made from the last sheaf.

Since Neopagans have three harvest holidays (Lúnasa, Autumn Equinox, and Samhain) in the widely observed “wheel of the year”, there is some debate over which holiday to burn a grain dolly. I would think the answer would be to make it close to one’s local grain harvest date. Arkansas grows soft red winter wheat as a commercial crop. Harvest begins in May and ends as late as the first week of July. So, for our locality, if you want to burn your grain dolly at the end of harvest, it makes sense to do so at Lúnasa, rather than at any of the later harvest holidays. That, and because it’s the harvest holiday that has a strong grain theme.

Note that I’m calling them grain dollies instead of the more traditional “corn dolly”. This is because Americans have confused traditional use of the word corn to exclusively mean maize. To the Europeans, corn meant grain. Corn dollies were not corn husk dolls. They didn’t have maize back then. Corn dollies were made of whatever grain various European cultures predominantly ate, like wheat or oats.

But we do live in the modern western world, and many would say that we need to adapt traditions to where we are and the way we live now. Americans in general do eat a lot of corn, both as a vegetable and as a grain, and as a sweetener (although Arkansas doesn’t grow much maize commercially). Corn husk dolls are easier to make than wheat dolls, which is probably a big part of why most American Pagans make corn husk dolls instead of the more traditional grain dollies for harvest holidays. The materials are also easier to find. Not many people grow wheat in their backyard garden but plenty grow corn, or could get corn in the husk at any farmer’s market or grocery store. Maize harvest starts mid August in Arkansas and can last late into September or even October, so it would make sense to burn your cornhusk harvest dolls at the Autumnal Equinox or Samhain if you are so inclined.

Unless you are a farmer or a gardener who grows grains, your harvest doll is purely symbolic anyway, not made from the last sheaf of anything, but symbolic of the harvest for you personally. So make it of whatever materials represent the harvest for you (you’ll notice that one of the dollies in the picture below is made of both cornhusks and wheat), and burn or bury it at whichever of the harvest (or spring) holidays that you feel drawn to do so.

Harvest Dollies | Ozark Pagan Mamma

Solstice Sun Shirt

Standard

All you need to make this festive sunny attire is a sun-colored shirt (perhaps one you’ve tie-dyed in light sunny colors), contact paper, scissors, an iron, a piece of cardboard the width of your shirt, and fabric crayons.

Prewash the t-shirt and iron out any wrinkles, if necessary. Insert the cardboard inside the shirt to give you a hard surface to work on. See my tutorial for making tissue paper sun faces, and use that method to cut out a design with the contact paper, keeping the design simple.

Next comes the tricky part– peel off the back of the contact paper and lay your resulting sticky stencil on the front of the shirt. Use your fabric crayons to color in the features of the sun face and other details, and along the edges, fading as you go out from your design. For best results, use colors that contrast the colors of your shirt, so the design will show up. When finished coloring, peel off the stencil. Follow the directions that came with your fabric crayons for setting your design permanently into the fabric.

Solstice Sun Shirt

For more Summer Solstice fun, see Kids’ Activities for Midsummer / Summer Solstice.

greenman doll

Standard

This greenman doll is bendable! Your kids will love hanging one from a tree branch or from a Spring Equinox basket. Here’s how I made it:

greenman doll template

Print out the template above. (If you copy and paste onto a word document, it should fill up half the page in landscape mode. If it doesn’t, shrink or expand to get the right size.) This doll is actually sewn before it is cut out, so you’ll need to trace the pattern onto the wrong side of your fabric. I used an iron-on transfer pencil and traced over the outline, then ironed it onto back of the fabric. With the right sides of two pieces of fabric facing each other and pinned in place on the corners, sew (a very fine stitch) on the lines all the way around. Now cut closely around the outside of the lines you’ve sewn. To turn the doll right side out, cut a small slit in the middle of the doll’s chest. Use a skewer get the skinny parts all the way pushed out. (Sorry I don’t have pictures for these first few steps… this doll has actually been in my basket of unfinished projects for years- from when I still had a working sewing machine.)

becoming a greenman

When you’ve got it all turned out, take a couple of chenille stems and twist one in the middle to the size of the doll’s head, and twist the ends down to form loops for the hands. Tape sharp ends down. The other chenille stem is for the legs. Bend it in half and twist loops at the ends for the feet. Tape sharp ends down. Insert chenille stems into the doll casing through the slit cut in the chest. When they are in place, fill the doll with stuffing, putting in little bits at a time and pushing into place with a skewer. When the stuffing is even all over, sew the slit in the chest closed by hand.

greenman doll comes to life

Glue a silk leaf onto the doll’s chest wound. (Re-purpose the leaves from old silk flower arrangements found at a thrift store.) I hot glued three onto this one’s chest at different angles. For the face, I folded a leaf in half and cut leaf and horn shapes around the edges. I’ve made some before using several very small leaves arranged around the face. Paint on or draw on features with a marker and you’re done!

greenman doll - Ozark Pagan Mamma

Frigga Tile

Standard

Recently, I finished a series of seven Norse deity tiles for my altar. There were some long gaps in time between making each one, and originally I aimed only to make tiles of the gods, and as for the goddesses, I made flat-backed figurines to hang on the wall in between the god tiles. However, at some point I thought it would look nicer to have them all be tiles.

My seventh tile was also my first craft project done in the new place. The inspiration for my Frigga tile was an illustration of Frigga from “Myths of Northern Lands” by Hélène Adeline Guerber.

In all my tiles, I’ve tried to include a specific feature so that each may be easily recognized as the deity they represent. So for Frigga, it was her distaff. It was actually harder to get the arm and hand shaped the way I wanted it than it was to form the distaff.

But the hardest part of the entire project for me was the face. Overall, I’d say my style of sculpting is “primitive”, though I have achieved much more detail than I ever thought I could with salt dough.

Frigga Tile

After the dough was completely air dried, I gave the tile a good coat of blue acrylic paint, them after that was dry, I sponged on light blue, mainly just getting the color onto the raised parts of the tile, letting the deeper lines and indentions remain the darker color. I let it dry for several days before I sprayed on a protective acrylic clear coat.

The tiles are roughly five and a half inches square. This one was made with regular salt dough, though most of the other ones were made with a stronger formula. All of them have a tack hole pressed into the back for hanging, although now I use plate hangers instead of hanging them from a tack since late last summer the humidity caused most of the ones I had made at that time to fall and break. (Don’t worry, I glued them all back- good as new, and gave them a clear coat.)

salt-dough altar tiles

Kids’ Activities for Imbolc / Winter Thermstice

Standard

EXPLANATION & INFORMATION

STORIES

  • “The Cailleach of the Snows” from the book “Celtic Memories” by Caitlin Matthews (for ages 8 and up).

CRAFTS

  • Make candles with beeswax sheets.
  • Make candle holders with salt dough.

ACTIVITIES

  • Look for early signs of Spring. What is the first flower to make its way through the thawing soil? What kinds of birds and other wildlife do you see? This is a good time to start a nature journal.
  • Do a Spring cleaning of your room, as well as helping the grown-ups clean the rest of the house.
  • With a grown-up’s help, make juniper room spray with a few drops of juniper oil (or a sprig of juniper) in a small spray bottle of distilled water. Use this as a spiritual cleanse on Pagan holidays.
  • Decorate a nature table with an Imbolc nature scene; put down a white cloth for snow, some green cloth for the greening land, a doll dressed like the goddess Brigit, and some of her animals (swan, cow, sheep, hibernating animals…).
  • Help grown-ups with preparing special Imbolc foods.

Kids' Activities for Imbolc

The 11th Night of Yule

Standard

The eleventh night of Yule is sacred to all the Goddesses and and the Valkyrie.

Favorite Valkyrie/goddess crafts are gathered or made to adorn the altar. If you’re not in the mood for crafts, bird ornaments and angel figurines can be used to represent the goddesses and Valkyrie, with beautiful results.

Earth Mother

Our soundtrack for the night is Wagner’s Der Ring des Nibelungen for it’s elegance and timelessness. For our ritual meal I like to include Himmel und Erde (heaven and earth), a German dish consisting of apples (from the heavens) and potatoes (from the earth).

Our simple dinner blót includes a Valkyrie invocation and a litany of goddess hails, along with praises of their blessings.

11th Night of Yule

Crafts for the 12 Days of Yule

Standard

On the 1st Day of Yule, Modranicht, make Yule Hearts in honor of the Mothers.

On the 2nd Day of Yule, the Night of the Wild Hunt, make a craft stick model of Sleipnir, Odin’s eight-legged horse.

On the 3rd Day of Yule, the High Feast of Yule, make paper cornucopias to fill with treats and hang on your Yule tree.

On the 4th Day of Yule, sacred to Ægir, Njörðr, and Freya, make a Vanir treasure box.

On the 5th Day of Yule, sacred to community, make a community wreath.

On the 6th Day of Yule, sacred to the goddess Eir and Healing, make healing bath crystals.

On the 7th Day of Yule, Sacred to Thor, make a craft-stick Mjölnir to hang on your Yule tree.

On the 8th Day of Yule, Sacred to Skadi & Ullr, make Skaði and Ullr figurines.

On the 9th Day of Yule, Sacred to Odin, make an Odin the Wanderer craft.

On the 10th Day of Yule, sacred to Sunna & the Ancestors, make paper sun crafts and ancestor yarn dolls.

On the 11th Day of Yule, sacred to the Goddesses & Valkyrie, make paper valkyrie & goddess ornaments.

On the 12th Day of Yule, Oath Night, make marzipan pigs for good luck in the new year.

*For most Heathens, the 12 days of Yule starts on the eve of the Winter Solstice. The date of the Solstice changes from year to year, but usually falls somewhere between the 20th and 22nd of December.
However, at my house we start our 12 day celebration on the 20th every year– even when it doesn’t fall on the eve of the Solstice. This is because when one is celebrating Yuletide as a 12 night event, starting on the 20th means the last night of the celebration ends up being on our modern culture’s New Year’s Eve. This holds special significance because the 12th night is Oath Night.

12 days of Yule crafts

12 Nights of Yule — Dough Ornaments

Standard

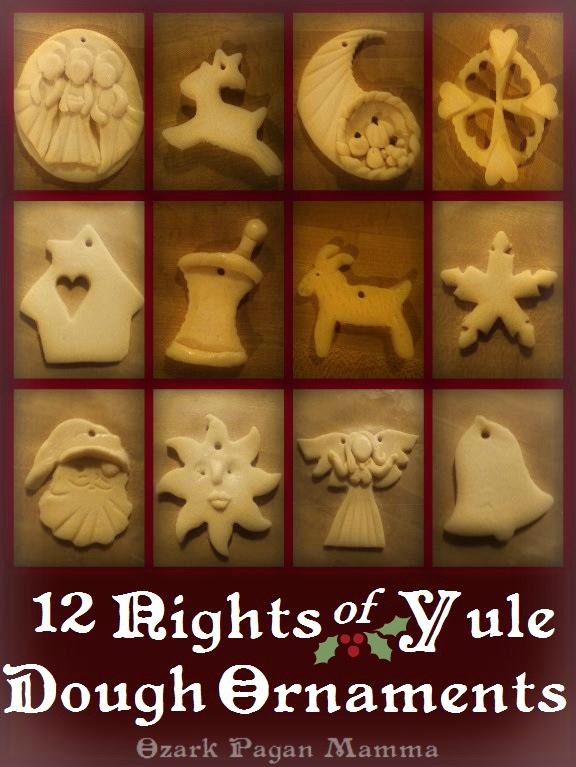
Simple symbols crafted in dough is a classic craft to help kids celebrate the 12 Nights.

Salt dough can last a long time if stored well. You can add cinnamon for color and scent. Apple cinnamon dough is another alternative with a darker color and stronger scent. Besides the dough ingredients, you’ll need a flat working surface, rolling pin, cookie and biscuit cutters, a butter knife, toothpick (and/or any clay tools you might like to use), a straw (for making a hole for hanging), and wax paper on a tray or piece of cardboard (for drying). After the ornaments dry, you’ll need string or ribbon for hanging.

Some of the symbols are pretty straight-forward cookie cut-outs, for others, there’s a little bit of method involved. Evenly roll out your dough to a medium thickness; too thin and it will break easily, too thick and it will weigh too much to hang on your Yule tree. Remember to lightly dampen dough with water when joining pieces or adhering to a base layer.

For the 1st Night of Yule, sacred to Frigga and the Dísir (ancestral guardian mothers), make a Three Matronae ornament. Roll out your dough and cut out a circle using a medium lid as a template. Cut out three triangles and attach to the circle side by side. Cut out three circles with a small circle cutter or bottle cap, and attach to base above triangles to represent hair or halos. Roll out smaller circles for their heads and flatten just above triangles. Roll out little coils of dough for their arms. Make little half circle bowls for one or more of them to hold. Poke a hole in the top for hanging and set aside to dry.

three mothers ornament

For the 2nd Night of Yule, the night of the Wild Hunt, simply roll out the dough and use a cookie cutter to cut out an animal shape that represents the Hunt. A horse is a good one, and so is a hound. It is easy to find deer cookie cutters and this would work nicely as well. Use tools to etch in details and texture, if you like. Poke a hole in the top for hanging and set aside to dry.

For the 3rd Night, the High Feast of Yule, make a cornucopia. Roll out your dough and cut out a large circle shape, using a biscuit cutter or lid. Use a small biscuit cutter (about 1/2 the size of the big one) to cut away a piece from the edge of your dough circle to where you have a fat crescent. Place a biscuit cutter over one of the crescent ends. Press down on one side only to round out and trim away the end. Roll out a dough coil and form into a circle to place on the rounded end of the dough circle. Use your thumb to indent dough inside coiled ring. Add little dough balls to represent fruit. (You can press in whole cloves for fruit stems.) Use the handle of a butter knife to press ridges into the cornucopia. Poke a hole in the top for hanging and set aside to dry.

cornucopia ornament

The 4th Night of Yule is sacred to Freya, Njörd, and Ægir, but we like to honor the whole of the Vanir gods as well. The wagon wheel is a symbol of the Vanir, and the heart is a symbol for Freya. To make this wagon wheel ornament, roll out your dough and use a lid or biscuit cutter to cut out a circle. Using a small heart cutter, cut our four hearts around the center, with points toward the center. This establishes a four spoke wheel. Take the hearts that were cut out and attach around the edges between the cut out hearts.

vanir wheel

For the 5th Night of Yule, the night of community, use a cookie cutter to cut out a house shape, and a small cutter to cut out a window. Alternatively, you could cut out out several people with cookie cutters and join their hands together. Poke a hole in the top for hanging and set aside to dry.

For the 6th Night of Yule, sacred to Eir, goddess of healing, make a mortar and pestle. Roll out dough and use a large biscuit cutter to cut out a circle. Use the same biscuit cutter to trim pieces out of both sides to resemble a mortar. Use a butter knife to cut a straight bottom. Attach a coil shape to the top (at a sideways slant) and a flatten a ball shape to the top of the coil. Make dough coils for the top and bottom rims of the mortar and attach. Poke a hole in the top for hanging and set aside to dry.

mortar and pestle

For the 7th Night of Yule, sacred to Thor, make Thor’s goat. Roll out you dough and use a goat cookie cutter to cut out the shape. If you don’t have a goat cookie cutter, use a deer cookie cutter instead; after you have cut out the shape, trim away the antlers and replace with little coils of dough to resemble goat horns. Use a fork to scrape in fur texture, or press some dough through a garlic press and attach to goat. Poke a hole in the top for hanging and set aside to dry.

For the 8th Night of Yule, sacred to Skaði and Ullr, make a snowflake. If you don’t have a snowflake cookie cutter, you can use a star cookie cutter. Roll out your dough and use the pointy end of a small heart cookie cutter to cut two notches out of the sides of each star point. Poke a hole in the top for hanging and set aside to dry.

snowflake ornament

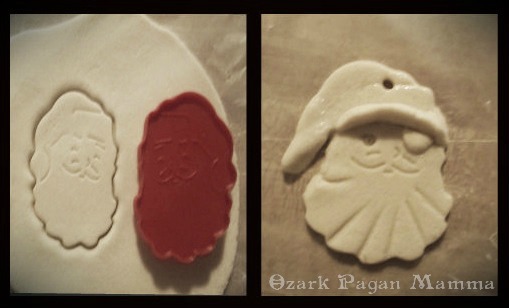
For the 9th Night of Yule, sacred to Odin, make a Yule Father ornament. Roll our your dough and use a Santa cookie cutter to press out your shape. You can make the ornament look more like Odin by pinching the top of the hat to make it pointy (instead of pom-pom topped), and pinching up a hat brim. You can also make him an eye patch. Press in face details with a toothpick or other tool. Poke a hole in the top for hanging and set aside to dry.

Odin ornament

For the 10th Night of Yule, sacred to Sunna and the Ancestors, make a sun ornament. If you don’t have a sun cookie cutter, use a flower cookie cutter instead. See my sun plaque article for tips on making a sun face. Poke a hole in the top for hanging and set aside to dry.

For the 11th Night of Yule, sacred to all of the goddesses and the Valkyrie, make a goddess/Valkyrie ornament. Roll out your dough and cut out a triangle shape. Cut out and attach two teardrop shapes to the triangle sides. Attach a cut out of an upside down heart over the top of the triangle, and a flattened dough ball above this. Use the handle of a butter knife to press in skirt folds. Use coiled dough to make the arms and hair. (Alternatively, you could use an angel cookie cutter to make this ornament.) Use toothpick or other tools to add details, if you like. Poke holes in the top of each wing for hanging and set aside to dry.

goddess ornament

For the 12th Night of Yule, Oath Night, sacred to all the gods, make either an Oath Night pig, or a bell to ring in the New Year. Roll out your dough and use your choice of cookie cutter to cut out your shape. Use tools to add details, if you like. Poke a hole in the top for hanging and set aside to dry.

When your ornaments are dry, you can paint them. If you added cinnamon to your dough (or used apple cinnamon dough), you will want to let the dough show instead of painting over it. But you may want to use a little bit of white puff paint on dark dough for accents and contrast. When paint is dry, lace a string or ribbon through the hole for hanging.

Parents, you can use the ornaments to help your child commemorate each Night of Yule… have each of them put away in their own individual drawstring bags (or drawers in a box), and have your child take out each ornament on it’s specified day and hang on your Yule tree.

12 Nights of Yule Dough Ornaments

salt-dough hog’s head

Standard

Long ago, people made their First Night oaths while placing a hand over a hog’s head at the last of the Yule feasts of the year. Modern Asatrúar usually use a ceremonial ring or hammer these days. However, I thought it would be fun to sculpt a hog’s head from salt dough to use in such a way, or at least use as an altar piece or table setting to remind us of our ancestors. Here is how I made it:

salt dough hog's head

1. First, I mixed up a batch of salt dough. To make the dough go further, and dry faster, I wadded up a piece of aluminum foil to go in the middle and wrapped the dough around it.

2. To the ball shape, I added a snout.

3. I used my thumb to indent eyes on either side of the head, and inserted blue marbles for eyes.

4. The end of a fork made a nice tool for creating a bit of fur texture.

5. I used a butter knife to create ridges on top of the snout.

6. The butter knife was just the right size for making the nostrils as well.

7. For the tusks, I made little indentions in the sides with the end of a wooden spoon and attached little tapered coils of dough. (Remember to lightly wet dough when joining pieces.) I used the same method to make the ears.

8. To add more dimension to the fur texture, I snipped lightly into the dough all over, from front to back, with scissors.

Later, I cut a slit in the mouth and inserted a ball of dough to resemble an apple. When the project was completely dry, I painted it with water-based antiquing medium, and painted the apple barn red.

Hog's Head